## Plugins Installation

Product: Monogram - Personal Portfolio WordPress Theme
URL: https://hub.jkdevstudio.com/docs/monogram/installation/plugins-installation
Updated: 2026-09-12

Monogram relies on several plugins to deliver its full feature set. After activating the theme, you will see a notification bar at the top of your WordPress dashboard prompting you to install the required plugins.

## Required Plugins

These four plugins must be installed and activated for the theme to function correctly:

<table style="min-width:75px;"><colgroup><col style="min-width:25px;"><col style="min-width:25px;"><col style="min-width:25px;"></colgroup><tbody><tr><th colspan="1" rowspan="1"><p>Plugin</p></th><th colspan="1" rowspan="1"><p>Source</p></th><th colspan="1" rowspan="1"><p>Description</p></th></tr><tr><td colspan="1" rowspan="1"><p><strong>JKDEVKIT</strong></p></td><td colspan="1" rowspan="1"><p>Bundled with theme</p></td><td colspan="1" rowspan="1"><p>jkdevstudio framework - provides the Kirki Customizer wrapper, license activation, and shared utilities</p></td></tr><tr><td colspan="1" rowspan="1"><p><strong>Advanced Custom Fields PRO</strong></p></td><td colspan="1" rowspan="1"><p>Bundled with theme</p></td><td colspan="1" rowspan="1"><p>Custom fields for portfolio metadata, header settings, and menu customizations</p></td></tr><tr><td colspan="1" rowspan="1"><p><strong>Kirki</strong></p></td><td colspan="1" rowspan="1"><p>WordPress.org</p></td><td colspan="1" rowspan="1"><p>Customizer framework powering Monogram 17 Customizer panels</p></td></tr><tr><td colspan="1" rowspan="1"><p><strong>Elementor</strong></p></td><td colspan="1" rowspan="1"><p>WordPress.org</p></td><td colspan="1" rowspan="1"><p>Page builder for creating and editing pages with Monogram 22 custom widgets</p></td></tr></tbody></table>

## Installing Required Plugins via TGMPA

Monogram uses the TGM Plugin Activation (TGMPA) library to manage required plugin installations. Here is how to install them:

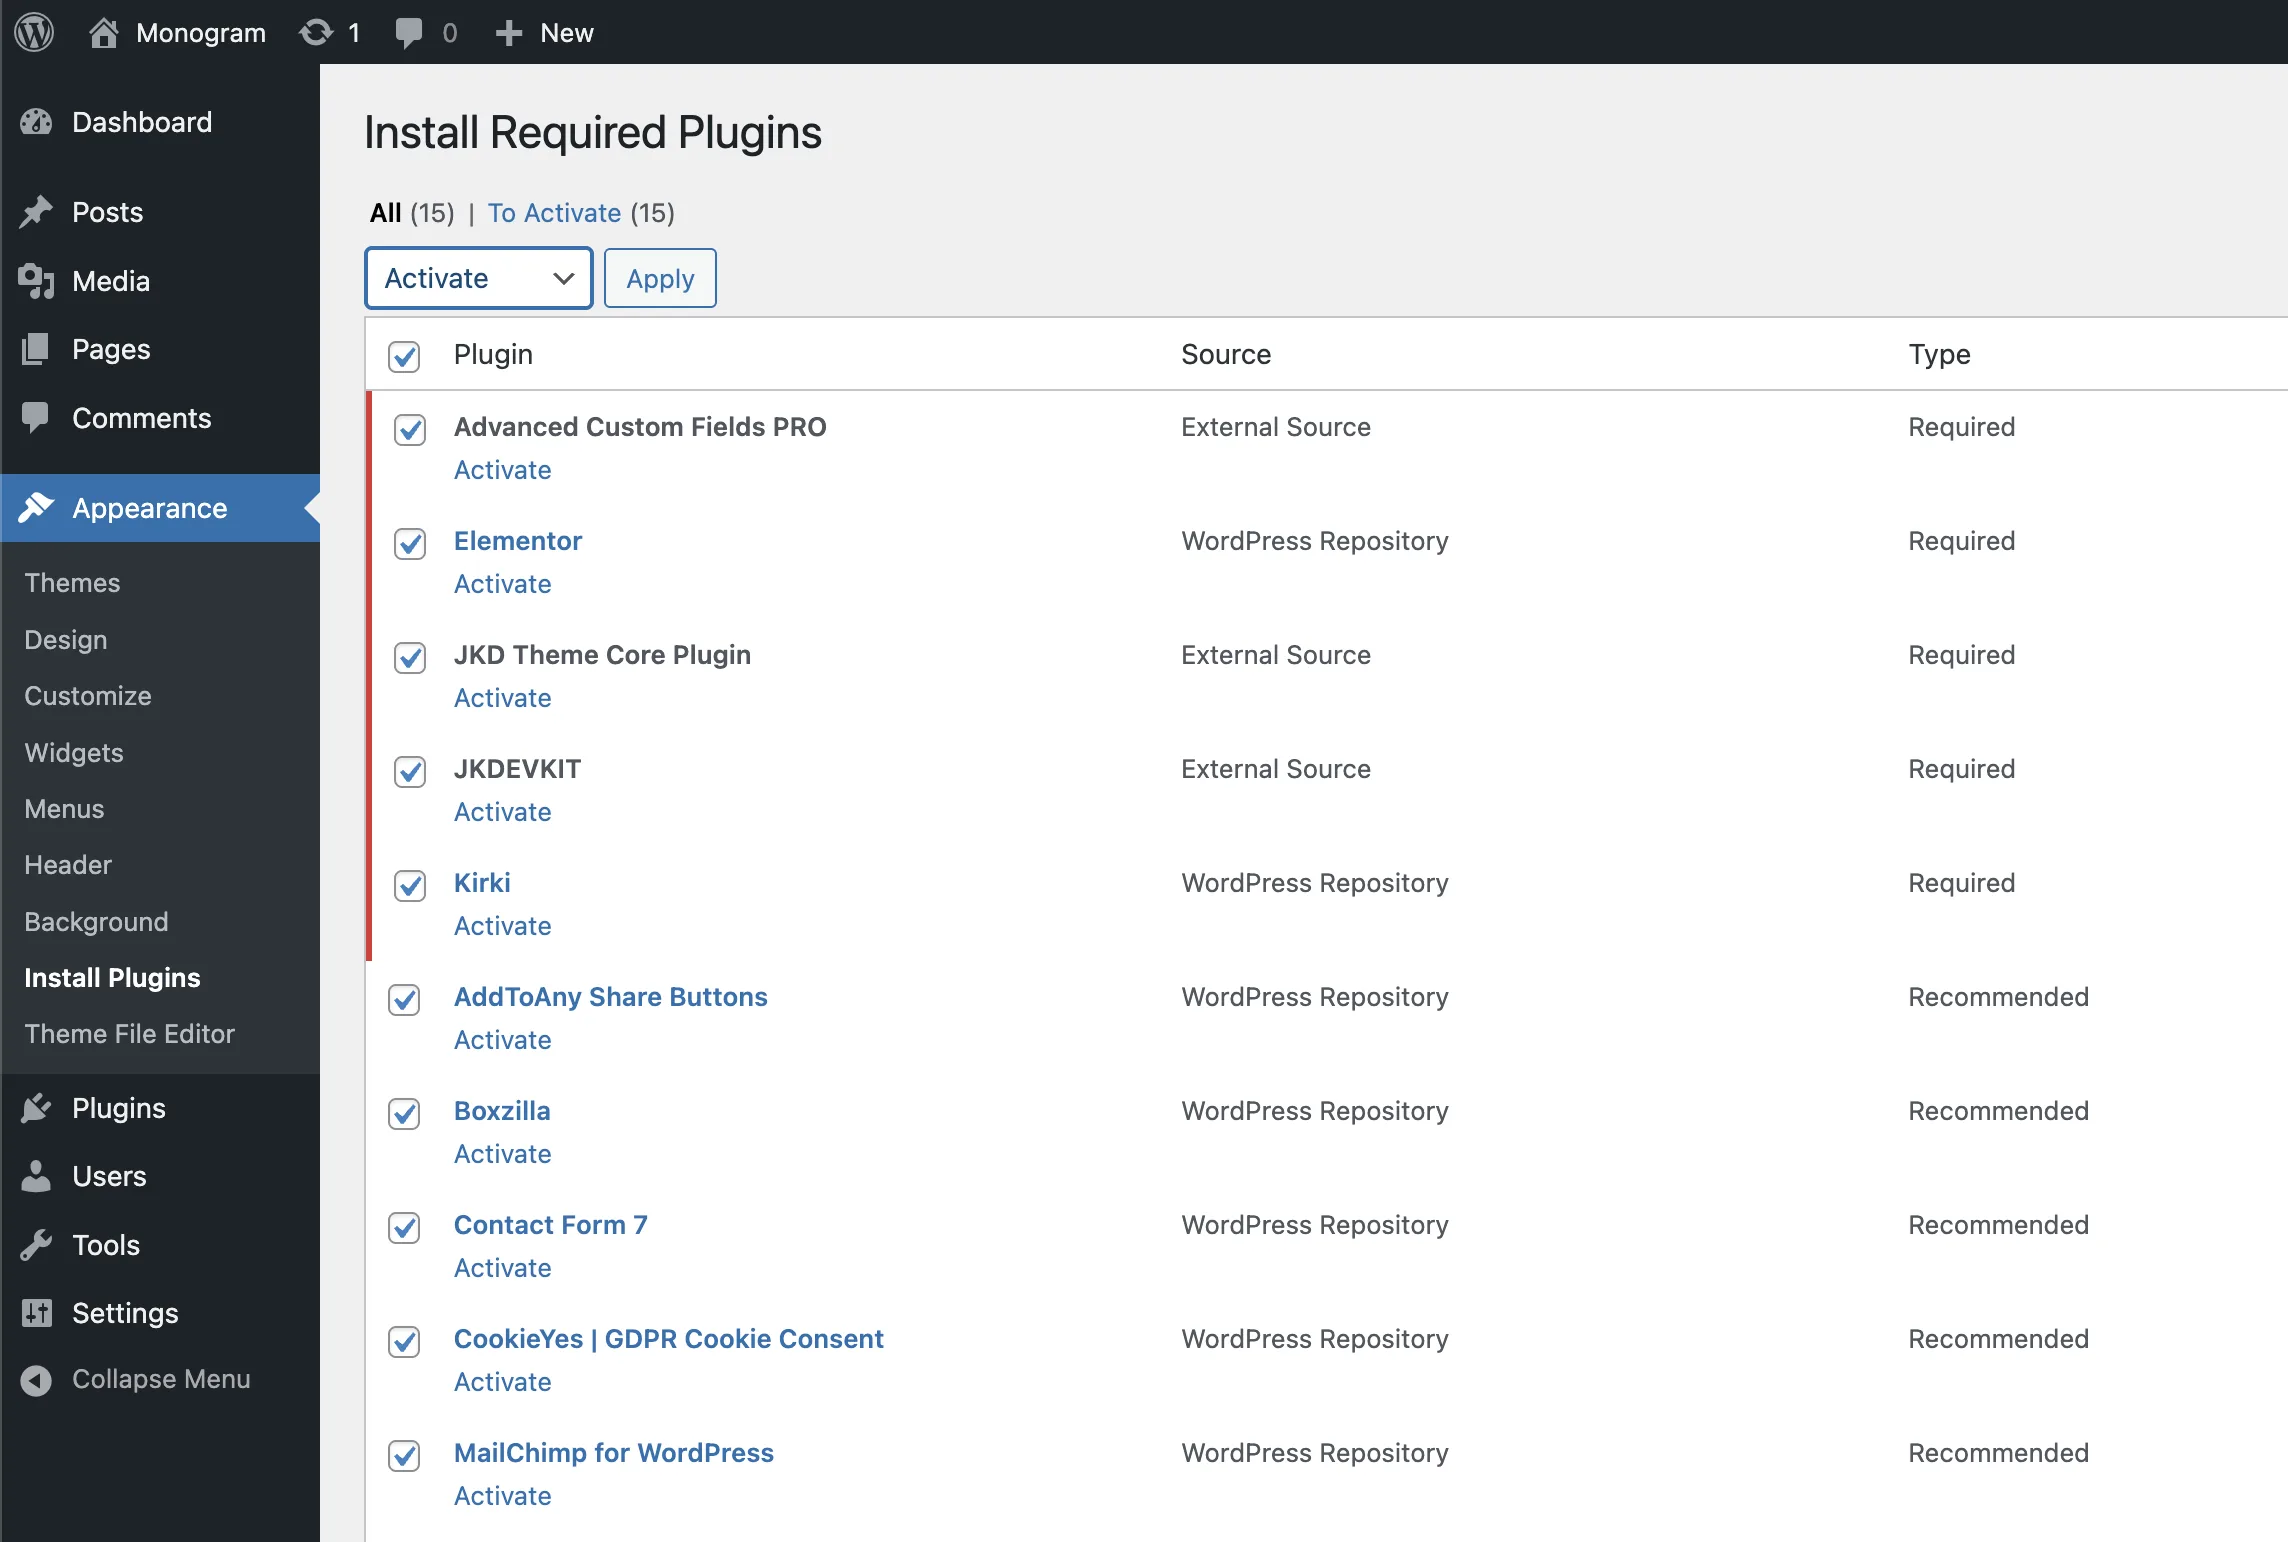
1. After activating the Monogram theme, look for the notification bar at the top of your dashboard that says **"This theme requires the following plugins..."**
2. Click **Begin installing plugins** (or **Begin activating plugins** if some are already installed).
3. On the plugin installation page, select **all plugins** by checking the checkbox at the top of the list.
4. From the **Bulk Actions** dropdown, select **Install** and click **Apply**.
5. Wait for all plugins to install. This may take a moment for the bundled plugins.
6. Once installed, return to the plugin list, select all plugins again, choose **Activate** from the Bulk Actions dropdown, and click **Apply**.

<figure class="doc-figure" data-width="50%" data-align="left"><img src="https://hub.jkdevstudio.com/storage/docs/2026/04/67fe6120-ef80-4cc7-8f61-d65aebe0061c.webp" alt="" class="doc-image rounded-xl max-w-full"></figure>

<div data-callout="tip">

You can also install plugins one by one by clicking the **Install** link next to each plugin name in the TGMPA list.

</div>

## Recommended Plugins

These plugins are optional but add valuable functionality to your Monogram site:

<table style="min-width:50px;"><colgroup><col style="min-width:25px;"><col style="min-width:25px;"></colgroup><tbody><tr><th colspan="1" rowspan="1"><p>Plugin</p></th><th colspan="1" rowspan="1"><p>Purpose</p></th></tr><tr><td colspan="1" rowspan="1"><p><strong>One Click Demo Import</strong></p></td><td colspan="1" rowspan="1"><p>Import the full demo site content, widgets, and Customizer settings with one click</p></td></tr><tr><td colspan="1" rowspan="1"><p><strong>Contact Form 7</strong></p></td><td colspan="1" rowspan="1"><p>Contact forms - Monogram includes a styled CF7 Elementor widget</p></td></tr><tr><td colspan="1" rowspan="1"><p><strong>MailChimp for WordPress</strong></p></td><td colspan="1" rowspan="1"><p>Newsletter subscription form integration</p></td></tr><tr><td colspan="1" rowspan="1"><p><strong>AddToAny Share Buttons</strong></p></td><td colspan="1" rowspan="1"><p>Social sharing buttons on posts and portfolio items</p></td></tr><tr><td colspan="1" rowspan="1"><p><strong>Boxzilla</strong></p></td><td colspan="1" rowspan="1"><p>Popup boxes and call-to-action overlays</p></td></tr><tr><td colspan="1" rowspan="1"><p><strong>CookieYes</strong></p></td><td colspan="1" rowspan="1"><p>GDPR-compliant cookie consent banner</p></td></tr><tr><td colspan="1" rowspan="1"><p><strong>Weglot</strong> or <strong>TranslatePress</strong></p></td><td colspan="1" rowspan="1"><p>Multilingual site translation</p></td></tr><tr><td colspan="1" rowspan="1"><p><strong>Yoast SEO</strong></p></td><td colspan="1" rowspan="1"><p>Search engine optimization tools</p></td></tr><tr><td colspan="1" rowspan="1"><p><strong>WP Search with Algolia</strong></p></td><td colspan="1" rowspan="1"><p>Lightning-fast portfolio search with Algolia</p></td></tr></tbody></table>

Recommended plugins appear in the TGMPA list alongside required plugins. Install any that you need for your site.

## Verifying Plugin Status

To check that all required plugins are properly installed and active:

1. Go to **Dashboard &gt; Appearance &gt; Install Plugins**.
2. All required plugins should show a status of **Active**.
3. If any required plugin shows **Not Installed** or **Inactive**, install or activate it.

Alternatively, go to **Dashboard &gt; Plugins &gt; Installed Plugins** and verify that JKDEVKIT, Advanced Custom Fields PRO, Kirki, and Elementor are all listed and active.

## Next Steps

With all plugins installed, proceed to [import the demo content](https://hub.jkdevstudio.com/docs/monogram/installation/demo-content-import) for a quick start, or jump to [Initial Configuration](https://hub.jkdevstudio.com/docs/monogram/installation/initial-configuration) if you prefer to set things up manually.